User Guide
About Swift+
Swift+ is a project management app designed to help software engineering (SWE) project leads in tracking their daily interactions with contacts. As a project lead, you can easily record down your clients and teammates by creating and editing contacts using Swift+. Using Swift+’s task management system, you can assign tasks to contacts and mark tasks as completed. Finally, you can gain an overview of your project with our intuitive side-by-side user interface.
Perfect for SWE professionals, Swift+ is built around a command line interface, complete with an autocomplete feature. If you have fast fingers, Swift+ can help you manage contacts and tasks more quickly than a traditional point-and-click interface.
This user guide provides details on how to use Swift+ in your daily workflow. This guide covers how to set up Swift+ and use its text-based commands. Get started now by heading over to the How to use this user guide section!
Table of Contents
- About Swift+
- How to use this user guide
- Getting Started
-
Commands
- Contact Commands
-
Task Commands
- Adding a task:
add_task - Listing all tasks:
list_task - Finding tasks by name:
find_task - Editing tasks:
edit_task - Deleting tasks:
delete_task - Selecting a task:
select_task - Marking a task as complete:
mark - Marking a task as incomplete:
unmark - Assigning a task to a contact:
assign - Unassign a task from a contact:
unassign
- Adding a task:
- General Commands
- Command suggestion and autocomplete
- Saving the data
- Editing the data file
- FAQ
- Command Summary
How to use this user guide
Icons
Throughout this website, you may find colored boxes that contain useful information. The icon at the top of the box represents the type of information contained.
| Icon | Meaning |
|---|---|
 |
Tips to help you make the most out of Swift+. |
 |
Information you should take note of while using Swift+. |
 |
Warnings that may corrupt your app and data if not followed. |
Sections
If you have not installed Swift+, head over to the Installation section.
After installing Swift+, you can refer to our Getting Started section on the basics of using Swift+. This includes the app’s,
If you are using Swift+ for the first time, we highly recommend that you read through the Getting Started section before the other sections.
To view each command in detail, you can head over to the Commands section.
If you are an experienced user, you can refer to the Command Summary for a quick overview of the commands in Swift+.
If you have any questions while using the app, please refer to our FAQ section.
For any further queries or suggestions, you may reach out to us here!
Getting Started
This section covers how to install and start using Swift+.
Installation
-
Ensure you have Java 11 installed in your computer.
-
Download the latest release of
swift+.jarfrom here. -
Copy the file to an empty folder. This will be your home folder for Swift+.
-
Double-click on the jar file to launch Swift+.
Congratulations! You have successfully set up Swift+.
The app comes with sample contacts and tasks by default. To delete the sample data quickly, you can use the
clear command.
Layout
After you open Swift+, the app will appear in the form of a graphical user interface, or GUI. In Swift+, you can toggle between the Contact View and the Task View. Let’s take a look at the different components in Swift+ below.
Swift+’s GUI:
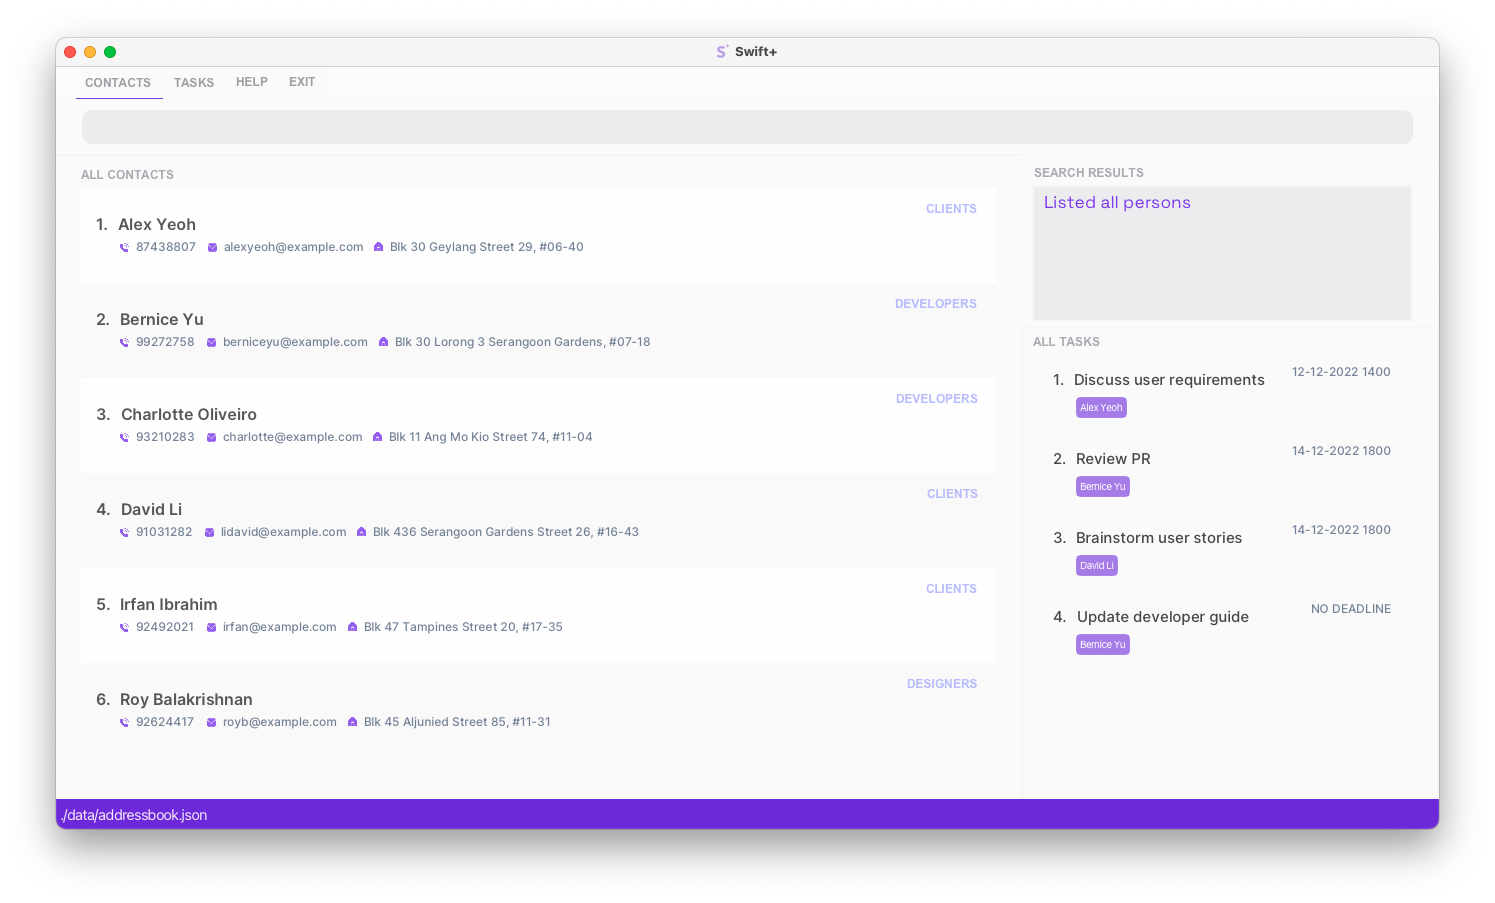
This table showcases the components shared by both Contact View and Task View.
| Component Name | Image |
|---|---|
| Menu Bar |  |
| Command Input Box |  |
| Command Results | 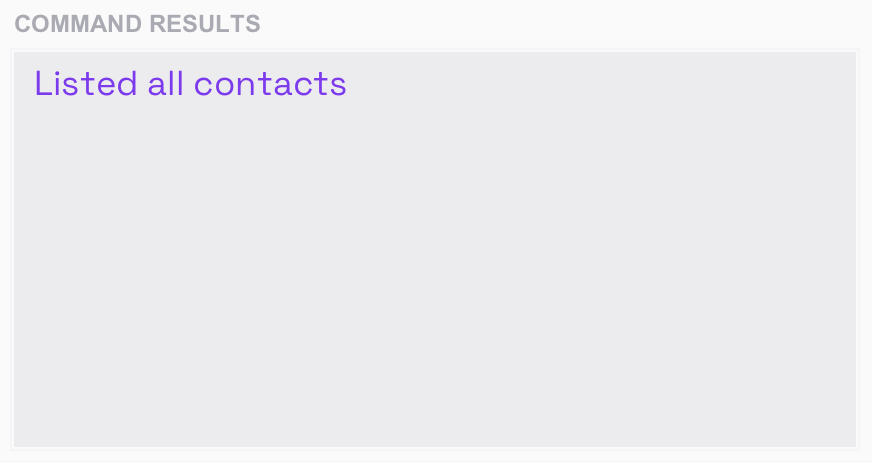 |
Contact View
The contact view is primarily for viewing contacts. The main panel on the left shows a list of contacts and all of their contact information. The right sidebar contains tasks with essential details.
| Component Name | Image |
|---|---|
| Contact List | 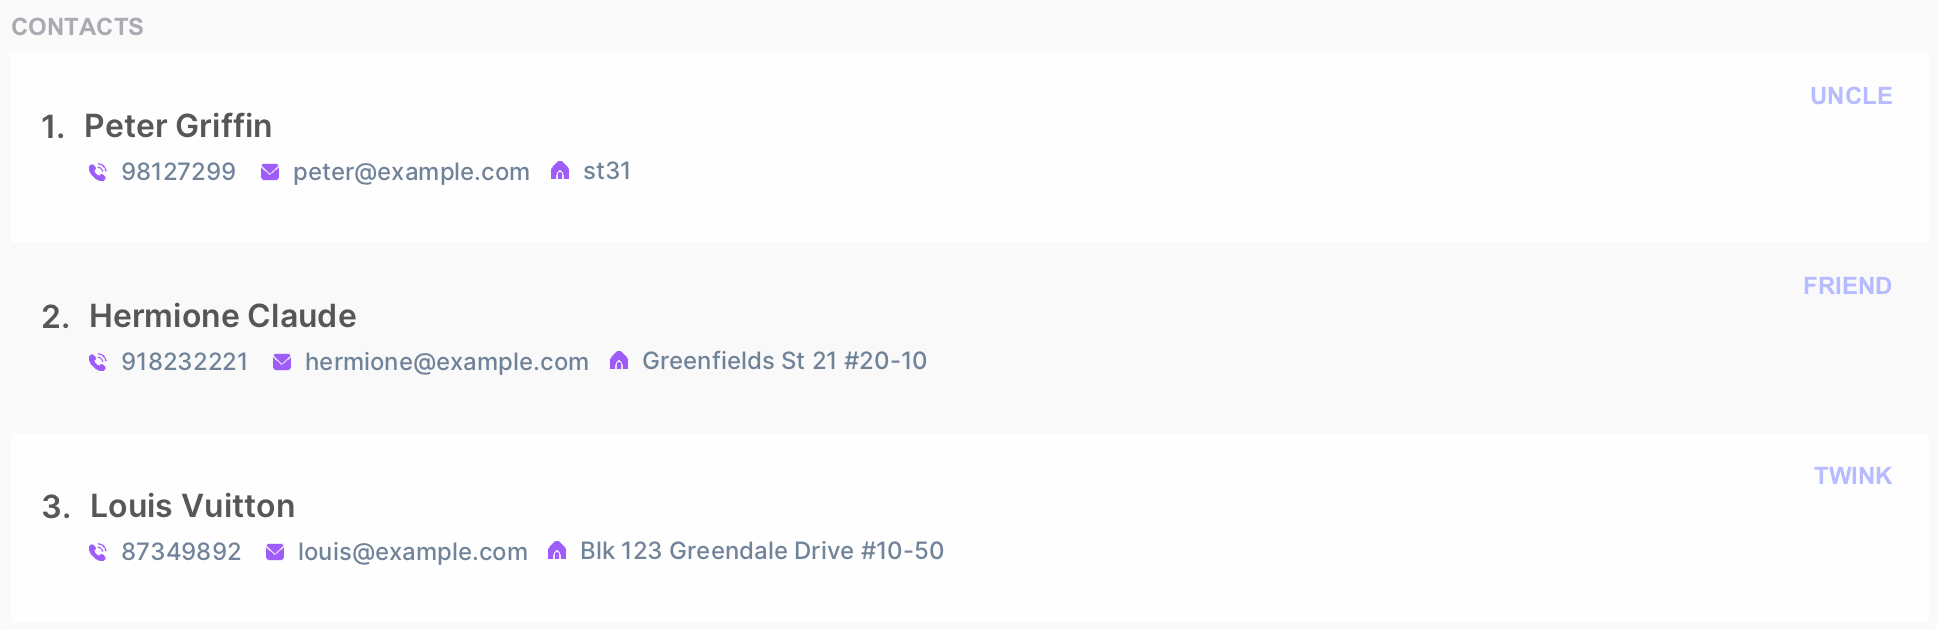 |
| Task Sidebar | 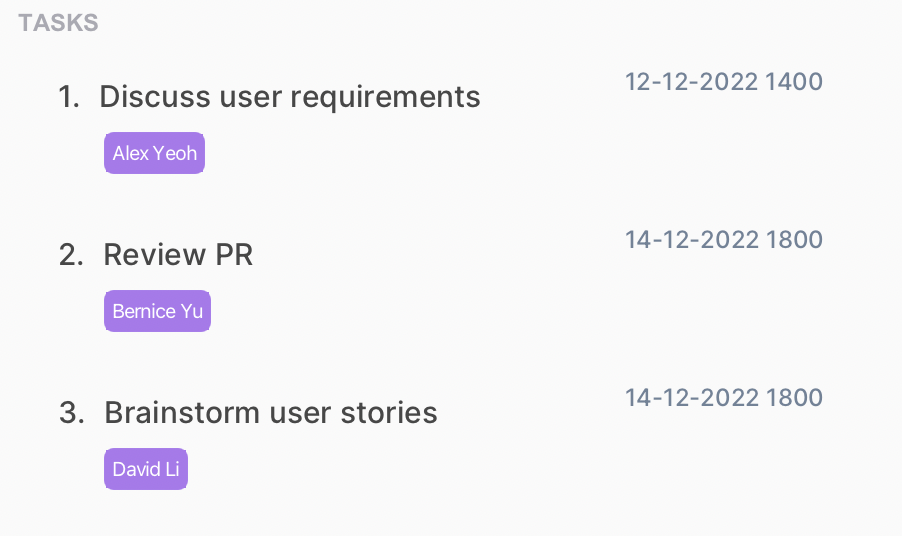 |
Task View
The task view is mainly for viewing tasks. The main panel on the left displays a list of tasks and all of their details. The right sidebar contains contacts with essential contact information.
| Component Name | Image |
|---|---|
| Task List | 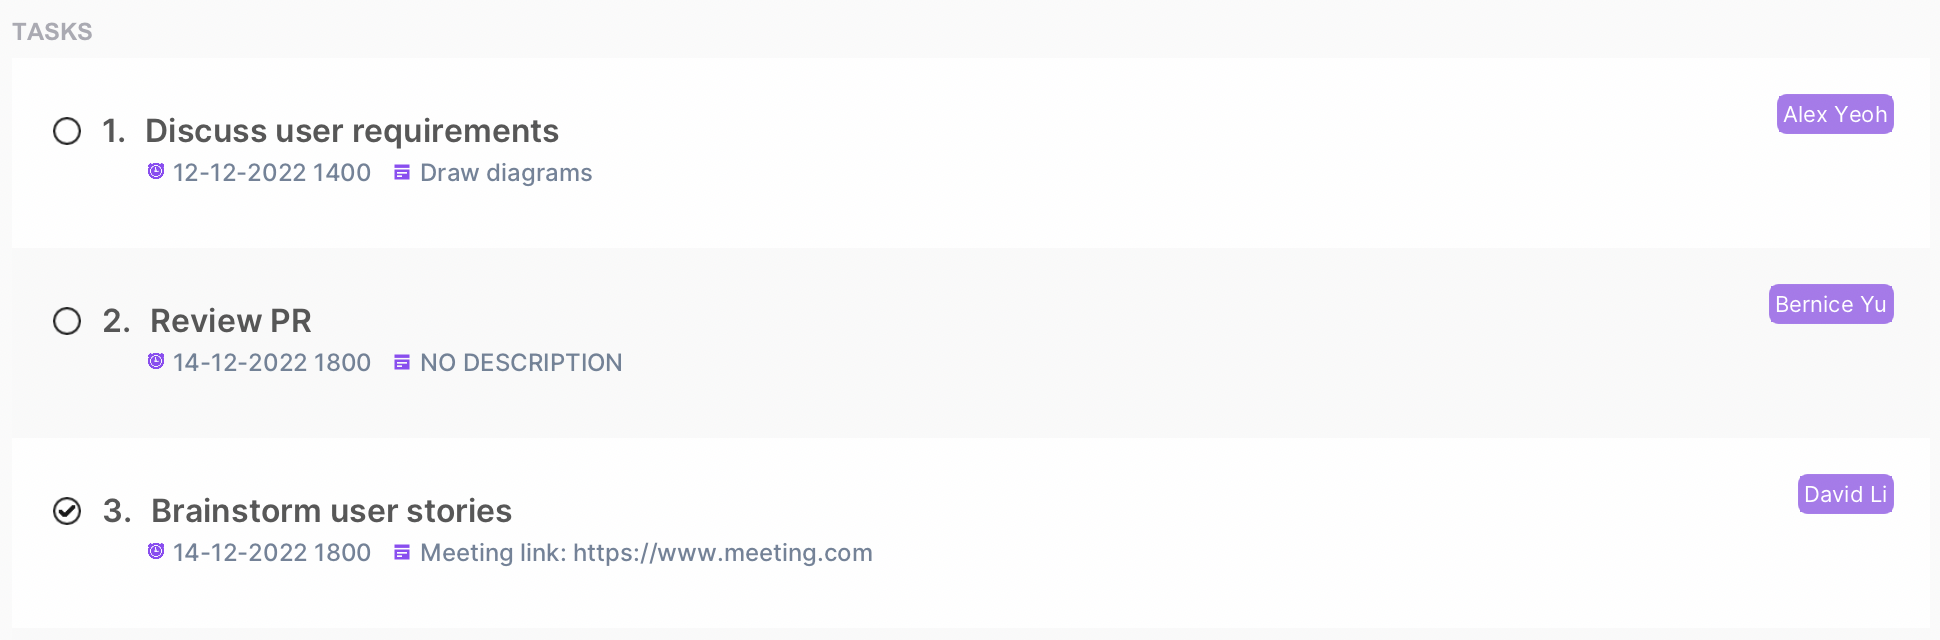 |
| Contact Sidebar | 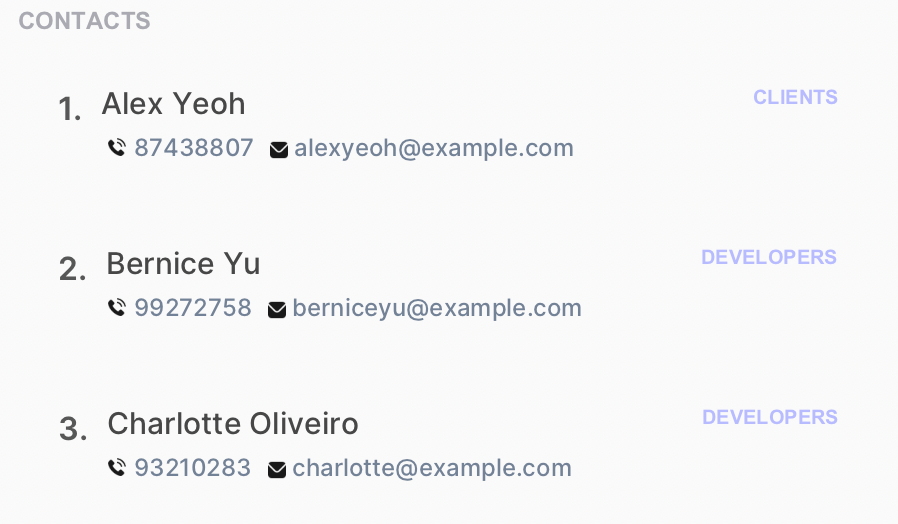 |
How to use Swift+ commands
Swift+ is built around text-based commands. Before we dive deeper into the details in the Commands section, let’s learn the basic components and format of a command.
Flag
A flag is a delimiter that allows Swift+ to distinguish different input fields. For each flag, you would put in the corresponding parameter immediately after.
| Flag | Corresponding Parameter |
|---|---|
a/ |
ADDRESS |
c/ |
CONTACT_INDEX |
d/ |
DESCRIPTION |
dl/ |
DEADLINE |
e/ |
EMAIL |
n/ |
NAME |
p/ |
PHONE_NUMBER |
t/ |
TAG, TASK_INDEX
|
Parameter
A parameter represents placeholders where you input data. Usually, parameters follow immediately after their corresponding flag.
Each parameter has unique constraints, which restricts what you can type in for the parameter. Refer to the table below for details.
Some parameters, such as
CONTACT_INDEX and KEYWORD, may not follow after flags.
Refer to the Command Format section on how to use flags and parameters together.
| Parameter | Corresponding Flag | Description |
|---|---|---|
ADDRESS |
a/ |
Specifies the address of a contact. An example use for this field include recording a client’s home or office address. |
CONTACT_INDEX |
c/ |
Refers to the index number shown in the displayed contact list.
|
CONTACT_NAME |
n/ |
Specifies the name of a contact.
|
DEADLINE |
dl/ |
Specifies the due date of a task.
|
DESCRIPTION |
d/ |
Specifies the description and details of a task.
|
EMAIL |
e/ |
Specifies the email of a contact.
|
KEYWORD |
Not applicable |
Specifies the keywords to search for when finding contacts or tasks.
|
PHONE_NUMBER |
p/ |
Specifies the phone number of a contact.
|
TAG |
t/ |
Specifies the tag to categorize a contact under.
|
TASK_INDEX |
t/ |
Refers to the index number shown in the displayed task list.
|
TASK_NAME |
n/ |
Specifies the name of a task.
|
Command Format
To understand how a full command is interpreted, let’s look at the following example.
Example: add_contact n/CONTACT_NAME p/PHONE_NUMBER e/EMAIL a/ADDRESS [t/TAG]…
| Component Name | Meaning | |
|---|---|---|
add_contact |
Command Word | Tells Swift+ to execute command to add contact. |
n/ |
Flag | Distinguishes CONTACT_NAME from other input fields. |
CONTACT_NAME |
Parameter | Represents placeholder for name of contact that you wish to input. |
Notice how t/TAG is wrapped in [ ]. Items in square brackets are optional.
- For example,
n/CONTACT_NAME [t/TAG]can be used asn/Mark t/friendor asn/Mark.
Furthermore, notice how [t/TAG] is followed by …. Items followed by … can be inputted multiple times, including
zero times.
- For example,
n/CONTACT_NAME [t/TAG]…can be used asn/Mark(i.e. 0 times),n/Mark t/friend,n/Mark t/friend t/family, and etc.
![]() Note
Note
- Parameters can be in any order.
e.g. if the command specifiesn/CONTACT_NAME p/PHONE_NUMBER,p/PHONE_NUMBER n/CONTACT_NAMEis also acceptable. - If a parameter is expected only once in the command but you specified it multiple times, only the last occurrence of the parameter will be taken.
e.g. if you specifyp/1234 p/5678, onlyp/5678will be taken. - Extraneous parameters for commands that do not take in parameters (such as
help,list_contact,exitandclear) will be ignored.
e.g. if your specifyhelp 123, it will be interpreted ashelp.
Commands
This section covers how to use each command in detail. You can refer to the Parameter section to view the constraints for each parameter.
Contact Commands
Adding a contact: add_contact
Adds a contact.
Format: add_contact n/CONTACT_NAME p/PHONE_NUMBER e/EMAIL a/ADDRESS [t/TAG]…
A contact can have any number of tags (including 0).
Examples:
-
add_contact n/Mark Yang p/12345678 e/mark@example.com a/block 123adds a contact namedMark Yangwith a phone number of12345678, email ofmark@example.com, and address ofblock 123. -
add_contact n/Anne Marie t/developer e/anne@example.com a/Newgate office p/87654321 t/clientadds a contact namedAnne Mariewith adevelopertag, afriendtag, email ofanne@example.com, address ofNewgate office, and phone number of87654321.
Listing all contacts: list_contact
Shows a list of all contacts in the main panel and a list of all tasks in the sidebar.
Format: list_contact
Example:
-
list_contactdisplays a list of all contacts, as shown in the diagram below.
Finding contacts by name: find_contact
Finds contacts whose names contain any of the given keywords.
Format: find_contact KEYWORD [MORE_KEYWORDS]
![]() Note
Note
- The search is case-insensitive. e.g.
markwill matchMark - The order of the keywords does not matter. e.g.
Mark Wilsonwill matchWilson Mark - Only the name of contacts is searched.
- Only full words will be matched e.g.
Markwill not matchMarks - Contacts matching at least one keyword will be returned (i.e.
ORsearch).
e.g. As shown in the diagram below,find_contact Alex Davidwill returnAlex YeohandDavid Li, since they contain the keywordsAlexandDavidrespectively.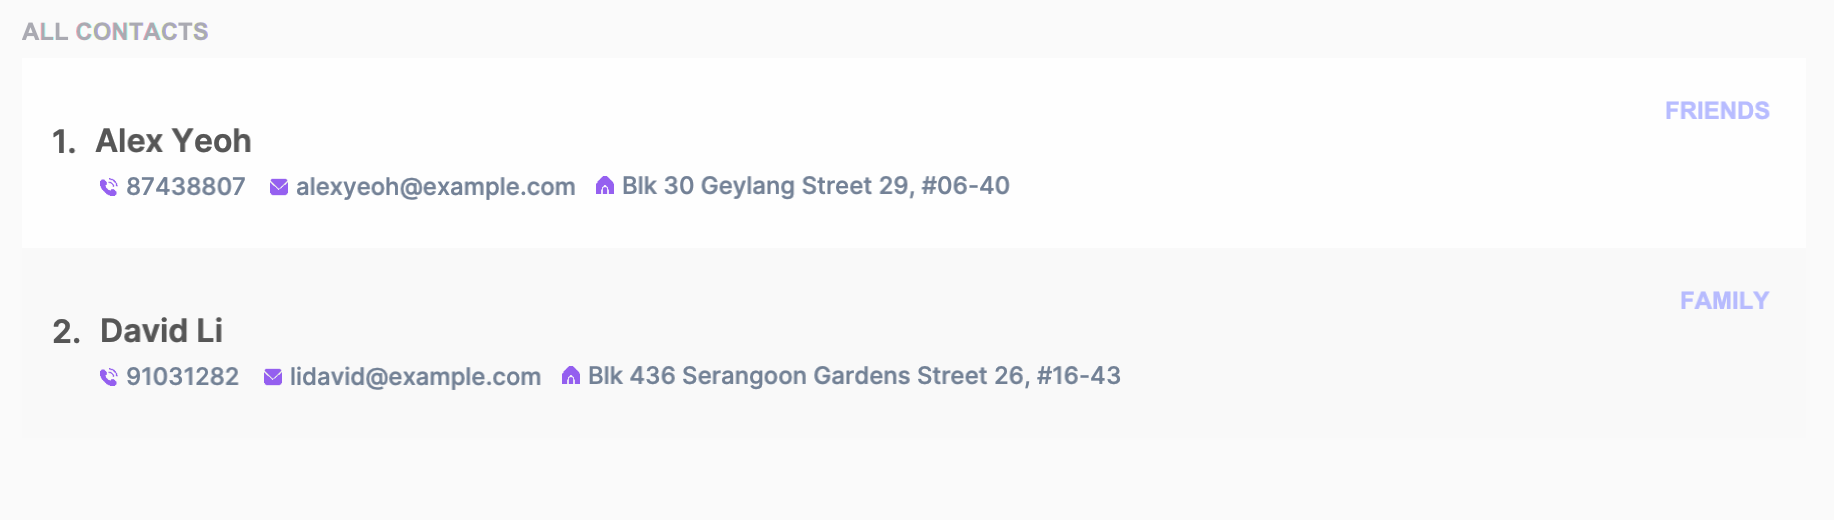
Examples:
-
find_contact MarkreturnsMarkandmark. -
find_contact mark wilsonreturnsMark YangandSteve Wilson.
Editing a contact: edit_contact
Edits an existing contact.
Format: edit_contact CONTACT_INDEX [n/CONTACT_NAME] [p/PHONE] [e/EMAIL] [a/ADDRESS] [t/TAG]…
![]() Note
Note
- Edits the contact at the specified
CONTACT_INDEX. - At least one of the optional fields must be provided.
- Existing values will be updated to the input values.
- When editing tags, the existing tags of the contact will be removed, i.e. adding of tags is not cumulative.
- You can remove all the contact’s tags by typing
t/without specifying any tags after it.
Examples:
-
edit_contact 1 p/91234567 e/mark@example.comedits the phone number and email address of the 1st contact to be91234567andmark@example.comrespectively. -
edit_contact 2 n/Anne t/edits the name of the 2nd contact to beAnneand clears all ofAnne’s tags.
Deleting a contact: delete_contact
Deletes the specified contact.
Format: delete_contact CONTACT_INDEX
Examples:
-
list_contactfollowed bydelete_contact 2deletes the 2nd contact in the entire contact list. -
find_contact Annefollowed bydelete_contact 1deletes the 1st contact in the results of thefind_contact Annecommand.
Selecting a contact: select_contact
Displays the selected contact in the main panel and displays the tasks assigned to the contact in the sidebar.
Format: select_contact CONTACT_INDEX
Examples:
-
list_contactfollowed byselect_contact 1selects the 1st contact in the entire contact list and shows all tasks assigned to that contact. -
find_contact Bernicefollowed byselect_contact 1selects the 1st contact in the results of thefind_contact Bernicecommand and shows all task assigned to that person.
e.g. In the screenshot below, we can see the selected contact on the main panel and their assigned tasks on the sidebar.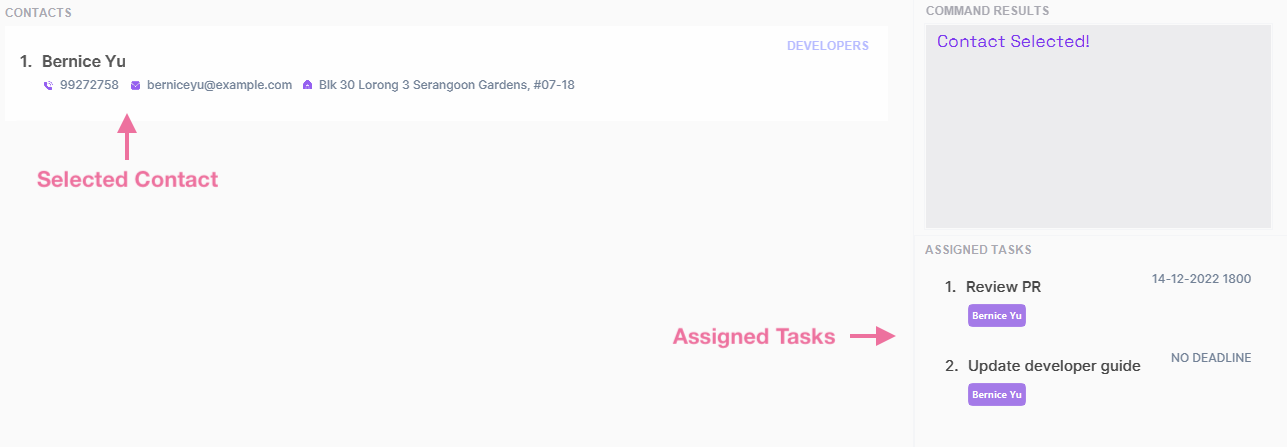
Task Commands
Adding a task: add_task
Adds a task.
Format: add_task n/TASK_NAME [d/DESCRIPTION] [dl/DEADLINE] [c/CONTACT_INDEX]…
Examples:
-
add_task n/CS2103T iP d/Finish milestones dl/12-12-2022 2359 c/1adds a task assigned to the 1st displayed contact. The task has a name ofCS2103T, description ofFinish milestones, and deadline of12 December 2022 23:59. -
add_task n/CS2101 Assignment dl/12-12-2022 2359 c/2 c/3adds a task assigned to the 2nd and 3rd displayed contact. The task has a name ofCS2101 Assignmentand deadline of12 December 2022 23:59.
Listing all tasks: list_task
Shows a list of all tasks in the main panel and a list of all contacts in the sidebar.
Format: list_task
![]() Note
Note
- Tasks are sorted chronologically by deadline.
- Tasks without deadlines are listed below tasks with deadlines and sorted by their names alphabetically.
Example:
-
list_taskdisplays a list of all tasks, as shown in the diagram below. Note that the first 3 tasks with deadlines are ordered chronologically and placed at the top. The last 2 tasks without deadlines are placed below.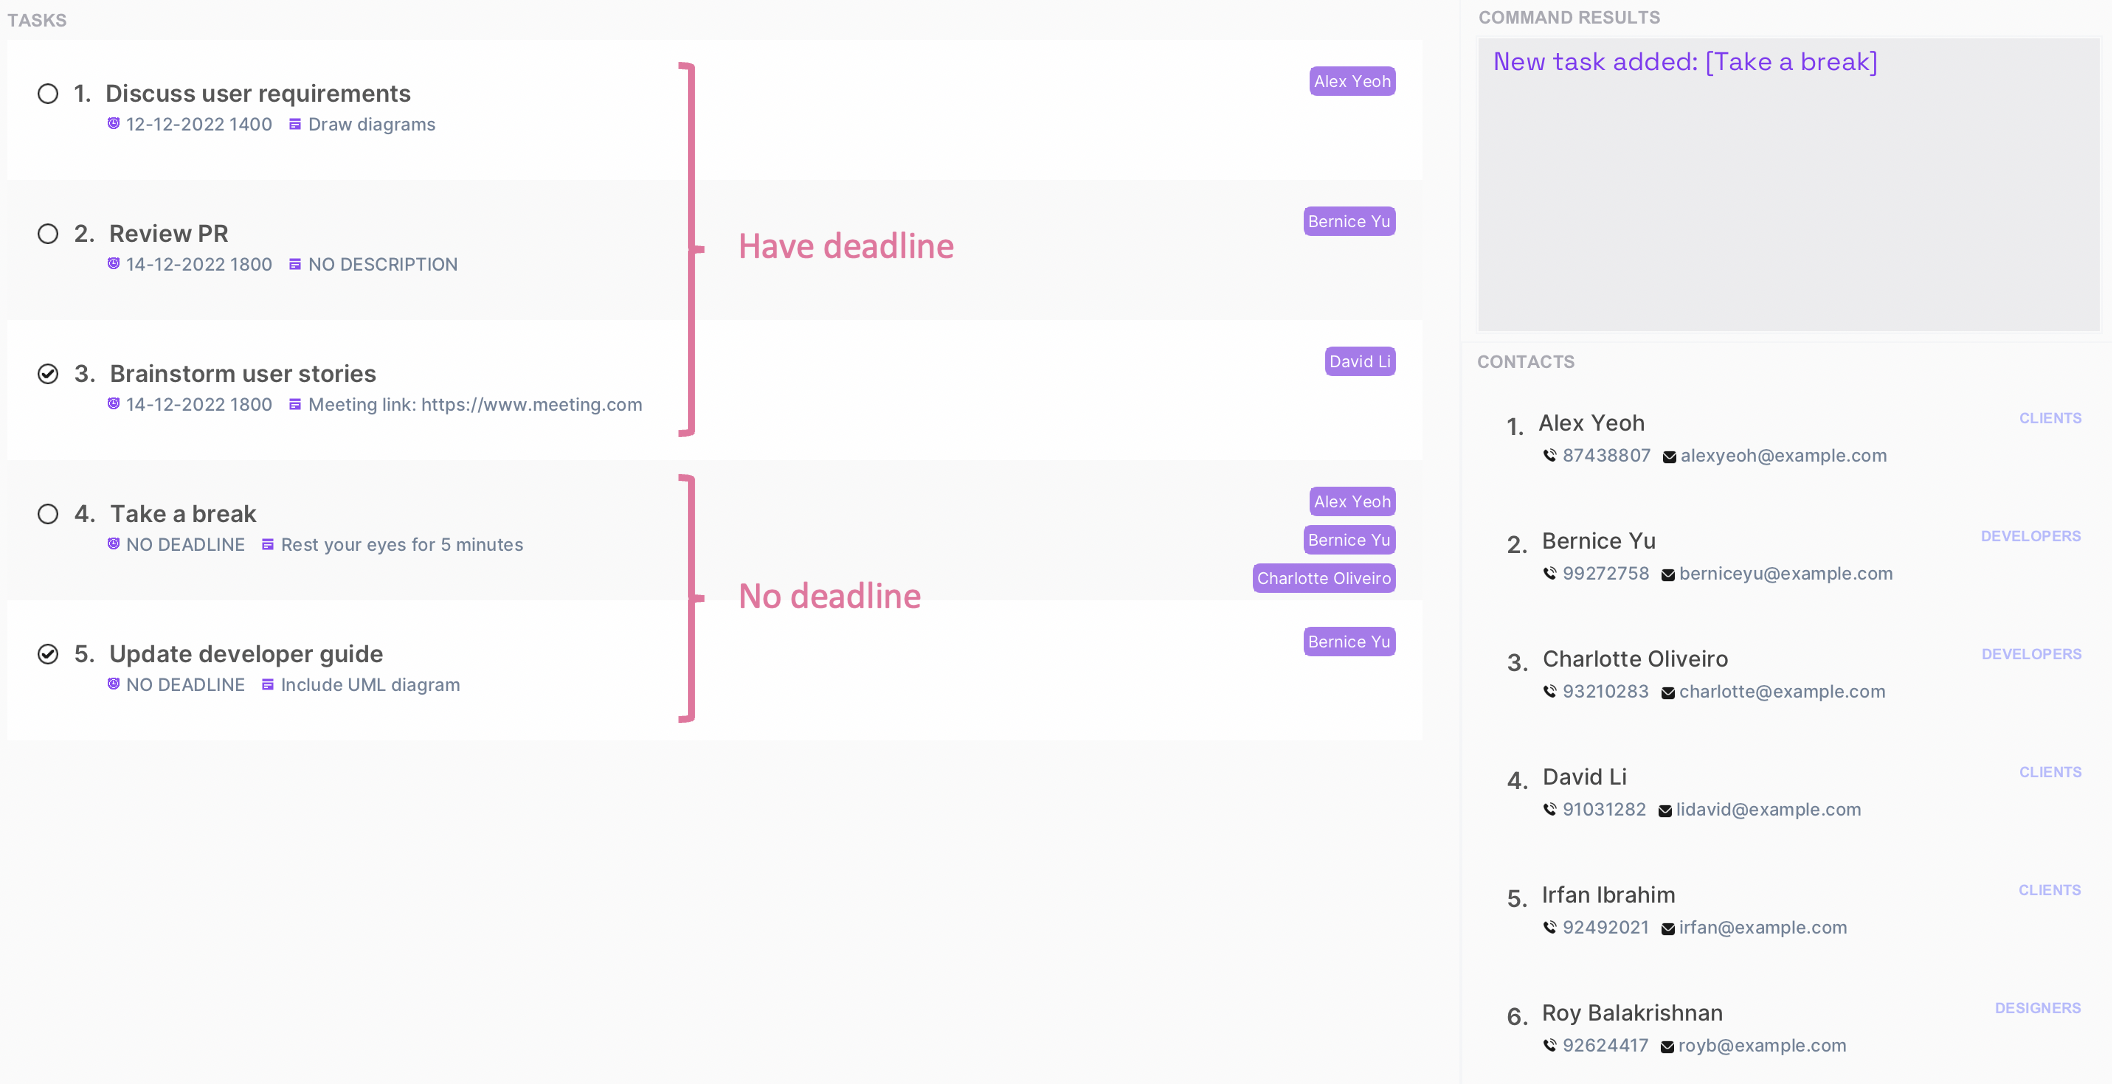
Finding tasks by name: find_task
Finds tasks whose names contain any of the given keywords.
Format: find_task KEYWORD [MORE_KEYWORDS]
![]() Note
Note
- The search is case-insensitive. e.g.
bookwill matchBook - The order of the keywords does not matter. e.g.
read bookwill matchbook read - Only the name of the task is searched.
- Only full words will be matched e.g.
Bookwill not matchBooks - Tasks matching at least one keyword will be returned (i.e.
ORsearch). e.g.Read bookwill returnWrite book,Find book
Examples:
-
find_task BookreturnsbookandBook. -
find_task read bookreturnsread novelandsell book.
Editing tasks: edit_task
Edits an existing task.
Format: edit_task TASK_INDEX [n/TASK_NAME] [d/DESCRIPTION] [dl/DEADLINE]
![]() Note
Note
- Edits the task at the specified
TASK_INDEX. - At least one of the optional fields must be provided.
- Existing values will be updated to the input values.
Examples:
-
edit_task 1 n/Client meeting d/Gather user storiesedits the task name and description of the 1st task toClient meetingandGather user storiesrespectively. -
edit_task 2 dl/06-12-2022 1200edits the deadline of the 2nd task to be06-12-2022 1200.
Deleting tasks: delete_task
Deletes an existing task in task list.
Format: delete_task TASK_INDEX
Examples:
-
delete_task 1deletes the task at index 1. -
delete_task 3deletes the task at index 3.
Selecting a task: select_task
Selects the specified task and displays the contacts assigned to the task.
Format: select_task TASK_INDEX
Examples:
-
list_taskfollowed byselect_task 1selects the 1st task in the entire task list and shows all contacts assigned to that task. -
find_task discussfollowed byselect_task 1selects the 1st task in the results of thefind_task discusscommand and shows all contacts assigned to that task.
e.g. In the screenshot below, we can see the selected task on the main panel and its assigned contacts on the sidebar.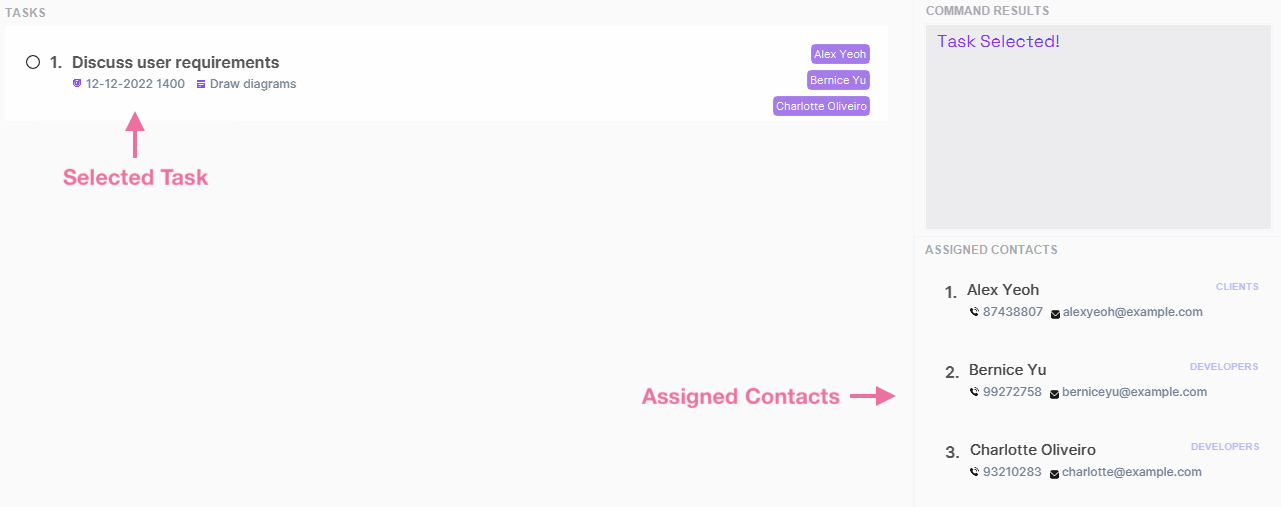
Marking a task as complete: mark
Marks the specified task as completed.
Format: mark TASK_INDEX
![]() Note
Note
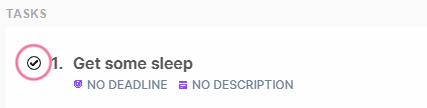
- Specified task must be currently incomplete for command to succeed.
- As shown in the diagram below, a ticked checkbox indicates a task being completed.
Examples:
-
list_taskfollowed bymark 1marks the 1st task in the entire task list as completed. -
find_task sleepfollowed bymark 1marks the 1st task in the results of thefind_task sleepcommand as completed.
Marking a task as incomplete: unmark
Marks the specified task as incomplete.
Format: unmark TASK_INDEX
![]() Note
Note
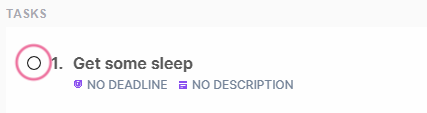
- Specified task must be currently completed for command to succeed.
- As shown in the diagram below, an empty checkbox indicates a task being incomplete.
Examples:
-
list_taskfollowed byunmark 1marks the 1st task in the entire task list as incomplete. -
find_task sleepfollowed byunmark 1marks the 1st task in the results of thefind_task sleepcommand as incomplete.
Assigning a task to a contact: assign
Assigns a task to a contact.
Format: assign c/CONTACT_INDEX t/TASK_INDEX
![]() Note
Note
- Assigns the task at the specified
TASK_INDEXto the contact at the specifiedCONTACT_INDEX. - Existing assignments are not affected.
- To view a task’s assigned contact(s), you can view the labels on the right side of the task list.
e.g. In the diagram below, the 1st task is assigned toAlex Yeoh.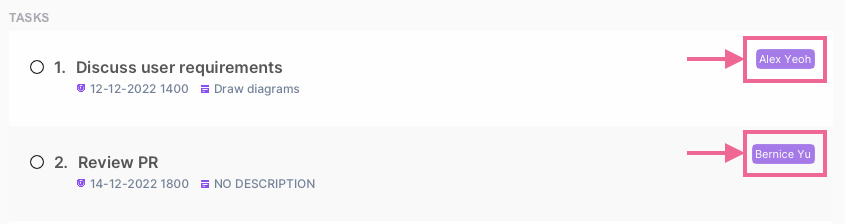
Examples:
-
assign c/1 t/1assigns the task at index 1 to the contact at index 1. -
assign c/3 t/2assigns the task at index 2 to the contact at index 3.
Unassign a task from a contact: unassign
Removes a contact from a task.
Format: unassign c/CONTACT_INDEX t/TASK_INDEX
![]() Note
Note
- Removes the contact at the specified
CONTACT_INDEXfrom the task at the specifiedTASK_INDEX.
Examples:
-
unassign c/1 t/1removes the contact at index 1 from the task at index 1. -
unassign c/3 t/2removes the contact at index 3 from the task at index 2.
General Commands
Toggling between contacts and tasks tabs: Ctrl + Tab
Toggles the view between the contacts and tasks tabs.
Format: Ctrl + Tab
Alternatively, you can click on the Contacts and Tasks button in the top toolbar.
Viewing help: help
Shows a message explaining how to access the user guide.
Alternatively, you can click on the Help button in the top toolbar.
Format: help
Clearing all data: clear
Deletes all data in the application.
Format: clear
Executing the
clear command will cause all of your existing data to be discarded forever and the app will start with an empty data file. There will be no confirmation prompt before clearing data.
Exiting the program : exit
Exits the program.
Format: exit
Alternatively, you can click on the Exit button in the top toolbar.
Command suggestion and autocomplete
To help you familiarize with the commands, Swift+ prompts you with command suggestions as you type and can autocomplete your commands until the next user-required input.
-
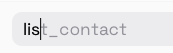
Type the first few letters of a command you hope to use and Swift+ will display a suggested command. e.g.
lis.
-
Press
Tabto autocomplete your command with the prompted suggestion.
![]() Note
Note
- If multiple commands are possible with the current input, autocomplete only completes up to the longest matching prefix. e.g. pressing
Tabafterliswill autocomplete the command tolist_, since there are two commands (list_contactandlist_task) that start withlis. - If the current input is invalid, command suggestions will not be shown. The current input will also turn red to alert you.
- Autocomplete does not guarantee a valid command, unless the given syntax is followed.
Saving the data
Swift+ data are saved in the hard disk automatically after any command that changes the data. There is no need to save manually.
Editing the data file
Swift+ data are saved as a JSON file [JAR file location]/data/addressbook.json. Advanced users are welcome to update data directly by editing that data file.
If your changes to the data file makes its format invalid, Swift+ will discard all data and start with an empty data file in the next run.
FAQ
Q: How do I transfer my data to another computer?
A: Install Swift+ in the other computer. Replace the default data file addressbook.json with the file that contains the data of your previous Swift+.
Q: Why does autocomplete not complete the whole suggestion after pressing Tab?
A: If multiple commands are possible with the current input, autocomplete only completes up to the longest matching prefix. e.g. pressing Tab after lis will autocomplete the command to list_, since there are two commands (list_contact and list_task) that start with lis.
Command Summary
This section contains a summary of all commands in Swift+ listed in alphabetical order.
| Action | Format |
|---|---|
| Add Contact | add_contact n/CONTACT_NAME p/PHONE_NUMBER e/EMAIL a/ADDRESS [t/TAG]… |
| Add Task | add_task n/TASK_NAME [d/DESCRIPTION] [dl/DEADLINE] [c/CONTACT_INDEX]… |
| Assign Task | assign c/CONTACT_INDEX t/TASK_INDEX |
| Clear Data | clear |
| Delete Contact | delete_contact CONTACT_INDEX |
| Delete Task | delete_task TASK_INDEX |
| Edit Contact | edit_contact CONTACT_INDEX [n/CONTACT_NAME] [p/PHONE_NUMBER] [e/EMAIL] [a/ADDRESS] [t/TAG]… |
| Edit Task | edit_task TASK_INDEX [n/TASK_NAME] [d/DESCRIPTION] [dl/DEADLINE] |
| Find Contacts | find_contact KEYWORD [MORE_KEYWORDS] |
| Find Tasks | find_task KEYWORD [MORE_KEYWORDS] |
| Help | help |
| List Contacts | list_contact |
| List Tasks | list_task |
| Mark Task | mark TASK_INDEX |
| Select Contact | select_contact CONTACT_INDEX |
| Select Task | select_task TASK_INDEX |
| Unassign Task | unassign c/CONTACT_INDEX t/TASK_INDEX |
| Unmark Task | unmark TASK_INDEX |